Dave Irvine
Javascript, mostly...
Posts:
- Skipping sequelize.define when making models in Sequelize 4
- Custom fonts in React Native
- Lenovo Tab 2 A10 with React Native
- Don't skim read the docs
- 90 Bytes is 720 bits
- Debugging Gulp tasks
- Nested Virtualization in XenServer 6.5
- Intel Corporation Wireless 7260 not authenticating on Linux with iwlwifi
- XenServer 6.5 Console Hanging
- qemu-img thick provisioning
- Windows Server 2012 OpenStack
- XenServer 6.5 NFS
- Wrapping Node.js' FS module in Promises and fixing EMFILE limit.
- Binding JavaScript models to the DOM, and vice-versa
- Adding when() to Mocha
- One Game a Month
- More efficient OpenGL (Part 2)
- More efficient OpenGL
- Blogging Again!
Skipping sequelize.define when making models in Sequelize 4
Just a short one, there is a way to not have to use sequelize.define() when defining a new database model in Sequelize 4. You can
in fact get away with the much nicer class User extends Sequelize.Model. zhanwenchen has the solution.
Custom fonts in React Native
Custom fonts can really improve the visual appearance of your React Native app, but font handling differs slightly between iOS and Android, and the React Native documentation on this subject is not very clear, especially for the edge cases.
For the most part you can follow tutorials like this, but Guillaume Diallo-Mulliez at his site provides the most pertinent information: Android requires the font files themselves to be named a specific way.
The key here is that font-weight and font-style affects which font file should be used. When no weight or style is specified
the font is regular, however the file should not include regular in its name.
I'm going to shorten and re-order the list that Guillaume provides to hopefully clear this up:
TittiliumWeb-Regular.ttf -> Tittilium Web.ttf
TittiliumWeb-Bold.ttf -> Tittilium Web_bold.ttf
TittiliumWeb-Italic.ttf -> Tittilium Web_italic.ttf
TittiliumWeb-BoldItalic.ttf -> Tittilium Web_bold_italic.ttf
Given this list you should be able to figure out the required combinations for other styles. Your css rules should now look like:
fontFamily: 'Tittilium Web',
fontWeight: 'bold',
fontStyle: 'italic',
If you just want to use your regular font, remove the fontWeight and fontStyle properties:
fontFamily: 'Tittilium Web',
Custom fonts definitely seem to be one of the more "dark magic" parts of React Native, but there is a set of rules to follow that actually make sense once you get to understand them.
Lenovo Tab 2 A10 with React Native
I recently picked up a Lenovo Tab 2 A10 for doing some React Native development. Its a suprisingly powerful tablet that you can pick up for less than £100 refurbished, and while it comes with Android 4.4, it has a System Update waiting to install that brings it to Android 5.0.1
After building an initial version of my React Native app that deployed just fine to an iPad Mini, I tried to deploy to the Lenovo, and was met with the following error:
Gradle: Error while uploading app-local-debug.apk : Unknown failure ([CDS]close[0])
Things did not look good in cheapo-android-tablet town, but a quick google rendered this matching problem with this solution, which I shall reproduce here:
Step 1: Change react-native/build.gradle version to 1.2.3

classpath 'com.android.tools.build:gradle:1.2.3'

Step 2: Change react-native/gradle/wrapper/gradle-wrapper.properties to gradle-2.2-all.zip

distributionUrl=https://services.gradle.org/distributions/gradle-2.2-all.zip
And now my £100 investment is worth it again!
Don't skim read the docs
The Brother QL-820NWB supports "two-colour" printing, i.e, black and red. It ships with two demo reels of labels, black-and-white die-cut labels, and 5 meters of black-and-red "continuous" label. Let's assume you want to trial the "continuous" mode, your only available choice is to use the black-and-red demo reel.
Hook up Brother's Android app for printing "iPrint&Label". Try to print to your new printer. It won't work. QL-820NWB will only print if the media type you select in the application matches the media currently present in the printer, and Brother's app doesn't know anything about black-and-red labels.
Now try and print without drivers using Raster mode. Of course the printer produces the same error, the media is still mismatched. Hunt through the documentation for "red", and you'll find nothing. Hmm. Lets try and set up the media type. The "Print Information Command" looks like it might be it:
ESC i z Print information command

Description
  Specifies the print information.
Excellent! Looks like we send a series of bytes to configure media options. Bytes like:
Valid flag; Specifies which values are valid
0x02: Media type
0x04: Media width
0x08: Media length
0x40: Priority given to print quality (invalid for two-color printing)
0x80: Printer recovery always on
Oh excellent! Media type sounds like it, lets look:
Media type
Continuous length tape: 0Ah
Die-cut labels: 0Bh
Oh. No mention of colour printing. And indeed, the "Print Information Command" will get you nowhere. What you actually want is the "Expanded mode" command, which is hidden away at the end of the docs, but will helpfully tell you:
ESC i K Expanded mode
Parameters
Definitions of {n}
The meaning of each bit in a 1-byte parameter is described below.

1bit: Two-color printing
2,3bit: Not used
4bit: Cut at end
  1:Cut at end (default)
  0:Not cut at end
5,6bit: Not used
7bit: High resolution printing
  1: It prints at 600 dpi in the paper length direction
  0: It prints at 300 dpi in the paper length direction.(default)
8bit: Not used
Well there we are. Simply change a 0 to a 1 and we're away.
Don't skim read the docs!
90 Bytes is 720 bits
Recently I needed to print to a Brother QL-820NWB thermal printer. Without drivers. Needless to say this was a thankless task, and the documentation was utterly and wonderfully confusing.
The QL-820NWB exposes a "Raster" mode which allows you to send bytes to the printer which are then printed directly, which essentially means we are directly addressing the 720 print heads available on the printer and telling them to be either "off" or "on" to print a pixel (ignoring 2-color mode).
The Raster mode allows us to send 90 bytes per "line" to be printed, and the documentation helpfully tells us how many "pins" are available to print with depending on the size of the labels being used. The amount given for my label size was "696", and I could see absolutely no relation between 696 "pins" and the 90 bytes I had available to print with.
Given that the printer is essentially black and white, I was certain that the 90 bytes I could send were
"on" or "off" signals, 0xFF and 0x00 respectively. This was definitely not the case, but did produce printable
output, its just the "pixels" appeared huge. It took a lot of sleep and a thorough re-read of the documentation
to make the leap that 90 bytes represented the entire 720 "pins", of which 696 were available for printing. So
0xFF was actually 11111111, 8 "on" pins.
Seeing the relationships between numbers has always been tricky for me, and in this case it set me back about two days worth of work.
Debugging Gulp tasks
Now that Node has the ability to use Chrome inspector built in, debugging Gulp tasks has become relatively simple. Its just a case of invoking gulp locally rather than globally, using the node binary.
The following command sorts it out:
node --inspect --debug-brk ./node_modules/.bin/gulp <task>
The --inspect flag sets up Node to use the Chrome inspector, and then the --debug-brk flag tells Node to break immediately to give you a chance to open the inspector. Specify the task to debug and away you go.
Nested Virtualization in XenServer 6.5
Suppose you want to run a guest VM in XenServer 6.5 that is itself a copy of XenServer 6.5. And then in that VM you want to run guest VMs. Of course you can do that! exp-nested-hvm is your friend.
It should be noted this is an experimental feature, and especially on AMD CPUs in the real hypervisor this is a bit unstable.:
xe vm-param-set uuid=<UUID> platform:exp-nested-hvm=true
While I wish I could claim I found this, credit goes to Justus Beyer, thanks!
Intel Corporation Wireless 7260 not authenticating on Linux with iwlwifi
I had an issue authenticating to wifi networks under Linux; I could see the networks, but upon trying to connect I was presented with an authentication prompt over and over again.
After a little investigation I found my Aorus X3-Plus is using an Intel Corporation Wireless 7260 card, and for some reason this was having issues. The general advice seems to be to set 11n_disable=1 but this didnt work for me.
The actual fix for me seems to have been disabling bt_coex_active. I believe this setting controls how hard the wifi module tries to avoid conflicting with the bluetooth module. Its on by default, and this seems to have caused the problems.
To fix this, make a new file in /etc/modprobe.d/:
options iwlwifi bt_coex_active=N
Follow this with a reboot and everything should begin working again!
XenServer 6.5 Console Hanging
Connecting to a fully virtualised VM console using third party VNC software while the VM transitions from bootloader to kernel was causing the VM to hang, and even XenCenter could not connect to the console afterwards.
This was particularly troubling when trying to do things like edit the bootloader options for the VM.
The eventual fix was to change the bootloader options by adding the following lines:
serial --unit=0
terminal --timeout=5 serial console
qemu-img thick provisioning
If you have a thinly provisioned disk image and require a thickly provisioned one, qemu-img will do this for you, but the command-line switch was a little obscure upon first reading. Here it is:
qemu-img convert -O <type> -S 0 <source> <dest>
As per the documentation, the -S switch adjusts the amount of consecutive zero'd bytes qemu looks for to create a sparse image. Specifying 0 prevents a sparse image from being created.
Windows Server 2012 OpenStack
Trying to install Windows Server 2012 in an OpenStack environment is unfortunately not quite as simple as you would first hope, but that doesn't mean its impossible! I've collected some steps that should see you right.
First, you're going to need a virtualisation environment on your own machine. Linux is the easiest place to do this, but I imagine its possible elsewhere as well. Let's get the tools installed:
sudo apt-get install vncviewer kvm qemu-kvm qemu-utils
With the toolstack installed, we need to create a disk image to install Windows to. 20G should do it, don't forget you can grow the disk once you've uploaded to OpenStack.
qemu-img create -f raw windowsr2.img 20G
The magic beans that makes all this possible are the VirtIO drivers. You can grab the latest ISO image from here. Place this ISO alongside your newly created Windows disk image.
You'll also need an ISO image of your Windows Server 2012 install disk. Place this with the VirtIO ISO you now have.
For this next command I've assumed the following:
- Your VirtIO ISO and Windows ISO are in the same directory as windowsr2.img
- Your VirtIO ISO is named virtio-win-0.1-100.iso
- Your Windows ISO is named windows_server_2012_r2.iso
kvm -m 2048 -no-reboot -boot order=d -drive file=windowsr2.img,if=virtio -drive file=windows_server_2012_r2.iso,media=cdrom -drive file=virtio-win-0.1-100.iso,media=cdrom -net nic,model=virtio -nographic -vnc :1
Your Virtual Machine will now begin booting, but ideally we need to see what is doing on, so lets launch VNC:
vncviewer 127.0.0.1:1
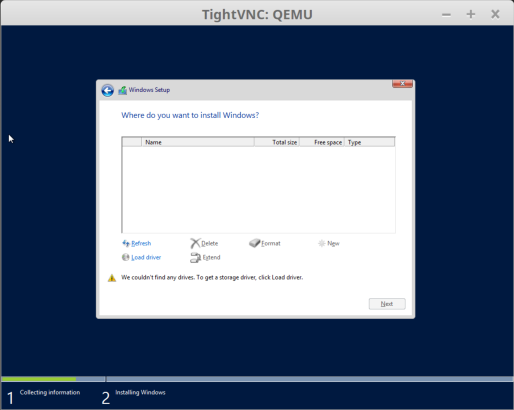
Once the Windows installation starts, click through as you usually would, filling in any license keys, etc. Eventually you will reach a screen which will make it seem like you can go no further!
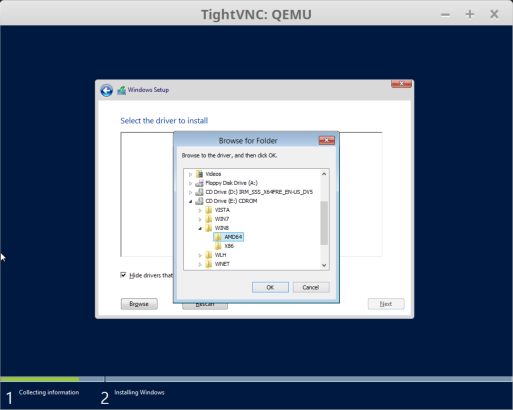
 Click Load Driver, and you should be able to find the VirtIO drivers. In my case they were in E:\WIN8\AMD64\
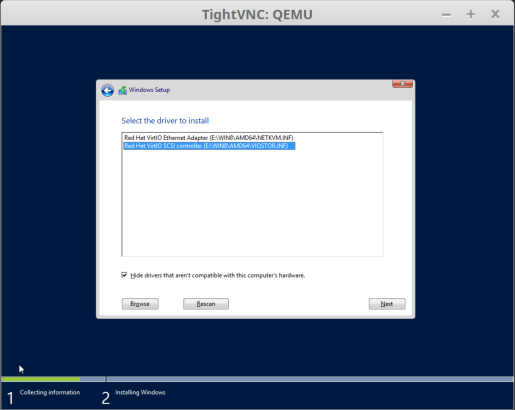
 You'll be presented with two drivers to load. Make sure you load the SCSI controller driver, not the Ethernet adapter.
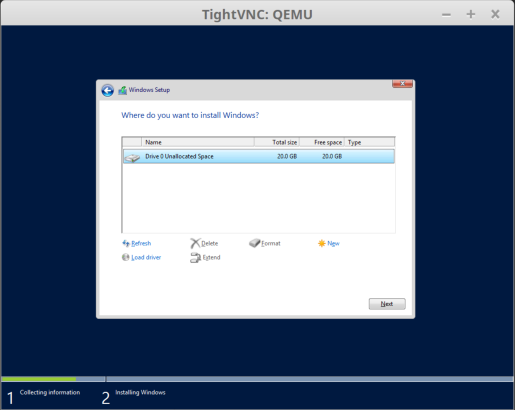
 Once the driver is installed, you should see a 20G disk which you can then partition appropriately.
You can then proceed through the installer as per normal. Windows will try to reboot the VM at a couple of points, which might look like the VM crashing, but you just need to relaunch with the kvm command above.
To get this image into OpenStack, upload windowsr2.img to your OpenStack infrastructure (it will zip to around 4G to save you some upload time!), uncompress it at its destination if you compressed it for transport, and then run:
glance image-create --name "Microsoft Windows Server 2012 (VirtIO)" --disk-format=raw --container-format=bare --is-public=true --progress --file windowsr2.imgOnce this is complete you should have a working Windows Server 2012 image imported into OpenStack. Congratulations!
XenServer 6.5 NFS
I recently upgraded XenServer to the 6.5 release, and while I'm very happy with it, I have discovered a small problem
The default ability to run an NFS daemon on the XenServer install, which was previously available in 6.2, no longer appears to work!
Having followed the usual steps to setting up an NFS daemon, I was greeted with the following in my system log:
nfssvc: Function not implementedand an nfs daemon that failed to start.
After a lot of fiddling, I discovered that the problem is simply that the nfsd module is not loaded! Simply:
modprobe nfsdAnd then restart the nfs service, and everything should work like magic.
If you want to automatically do this on boot, you can follow the RedHat guide for persistent module loading, or simply do the following:
$ echo '#!/bin/sh' > /etc/sysconfig/modules/nfsd.modules
$ echo 'exec /sbin/modprobe nfsd > /dev/null 2>&1' >> /etc/sysconfig/modules/nfsd.modules
$ chmod +x /etc/sysconfig/modules/nfsd.modules
Wrapping Node.js' FS module in Promises and fixing EMFILE limit.
I like Promises. I really do. They seem like a smart solution to the callback pyramid.
Q provides some handy utility functions for converting
Node.js functions into Promises, and that's awesome, but Node also has an issue with the EMFILE limit.
It seems to be fairly common to hit this limit, and the usual StackOverflow advice is to either bump kern.maxfiles (which seems foolish), or use graceful-fs (which is awesome).
While I love graceful-fs, as far as I can tell it only saves you from the EMFILE limit when using open() or readdir(), and I use other parts of the FS module!
So, here is FSQ; Node.js FS module wrapped in Q.js Promises, and protection from the EMFILE limit.
Very limited function implementation at the moment, I'll add more when I come to need them.
Binding JavaScript models to the DOM, and vice-versa
Adding when() to Mocha
I use Mocha to unit test my JavaScript code. More often than not I need to unit test across a bunch of different browsers
This is where when() steps in.
when() lets you specify a nested suite of tests to run only when a truthy value is passed as the first parameter to when(). This means you can write a truth-test for something like native support of Array.forEach(), and pass the result of this to when().
Inside your nested suite, write your unit-tests for your shimmed version of Array.forEach(). Voila, now your shimmed version is tested only if the browser you are running the tests in needs to use the shim!
Check out my pull request
One Game a Month
So I imagine I suffer with the same affliction that many indie game devs suffer from: An inability to release anything.
Games are easy to start and terribly difficult to finish. Talk of a 90% wall is abundant.
To try and ease the pain I'm taking part in One Game a Month. A genius idea, the brainchild of McFunkypants, 1GAM aims to provide some Gamification of the process of making games, pushing game devs towards making... one game a month, the clue is in the name!
So, as if keeping to a blog schedule wasn't difficult enough, I'm going to try and produce a game every single month in 2013. I might cheat a little and use my 2013 Global Game Jam entry as my January game, and a rewrite/tweak of my 2012 GGJ entry as my February. Hopefully this will give me a little buffer if I fall behind.
More efficient OpenGL (Part 2)
In trying to get VBOs to work I had settled on the idea of rendering all possible glyphs in a font down to a combined spritesheet, and then rendering chunks of that spritesheet to the screen in order to form the strings that I wished to display. This probably would have worked fine except I was consistently unable to render only part of a texture to a quad.
No matter how many ways back and forward I went attempting to render just a section of the texture, OpenGL did not want to play ball. Either it would render the texture upside down, mirrored or render the wrong portion. Eventually I refined my code down to the simplest example I could, and found that I couldn't render less than a 12 pixel wide portion of a texture, as this would show up as strip a single pixel wide on the screen. I still haven't worked out why this is.
In an effort to Keep It Simple, Stupid, I decided it would be a good idea to investigate if SDL had sped up its 2D rendering at all. Imagine my suprise when I discovered that its 2D rendering was now hardware accelerated (I think it uses DirectX on Windows)! I've subsequently thrown out all my OpenGL code and have started using SDL again. My life is so much easier. SDL provides dead-easy functions for rendering textures to the screen, rendering parts of the textures using clipping, and even flipping the textures during rendering to reduce the amount of textures you actually need.
Performance seems to be relatively on-par with immediate-mode OpenGL, and for now I'm happy. I'd love to see some sort of render call batching made available in SDL, but for all I know it might actually be doing this behind the scenes anyway!
I think it's worth remembering that there always seems to be a simpler way of doing things than you would first think.
More efficient OpenGL
I've been creating games in some form or other for several years. Due to my own inexperience I've never finished one, but I've experimented with several languages and frameworks.
Until recently my tools of choice were SDL on C++. My most recent toolset is: SDL on C++, the difference being I'm now layering OpenGL on top (or underneath, depending on how you look at it). I'd never really considered OpenGL before, as I've never had a need to use any 3D functionality (the maths for this is far beyond me), however SDL by itself was getting increasingly unwieldy at higher resolutions, and the general advice was to move to OpenGL and lock it into a 2D viewport.
After a week or so of tinkering I had some 2D sprites rendering quite happily, with my framerate locked at 30fps (I had previously tended to write code with a locked framerate so I could ensure I wasn't dropping below my minimum target), however when I decided to open it up and see how fast my beast of a PC could go, I was barely topping 60fps at 1024x768. Not ideal at all when I am essentially rendering 2D sprites to the screen.
A couple of minutes Googling introduced me to the concept that immediate mode
(the mode that most OpenGL tutorials teach you) is a Bad Thing™ and that my
constant use of glBindTexture was slowing things to a crawl. This
began my delve into Vertex Buffer Objects, which to me seems like massive
overkill for a 2D spriting engine, but there we go!
Stripping back all my code so that I am only rendering the framerate to the screen brought my back to about 4000fps, however dropping the code for generating the texture to represent the string I was trying to display, as well as the code for actually rendering this texture revealed a fps of about 6000, which was much better (this is now essentially the upper limit framerate for my PC, as I'm rendering absolutely nothing and am just clearing the screen and flipping buffers every frame).
So as an easy first port of call I decided to pre-render all possible characters from the font I was using into one spritesheet, and then use VBOs to render parts of this sheet to the screen in an order that will represent the strings that I want to display (this is a monospaced font, so I don't have to worry about kerning). Performing the renders and then displaying the full spritesheet to the screen brought me back to about 4K fps, so it appears that any use of immediate mode at all is resulting in a large performance hit.
Time to break out the VBOs! glGenBuffers to the rescue... oh wait, my
compiler doesn't know that symbol.. what's going on? Turns out, the current
stable release of SDL doesn't let us access newer OpenGL functionality (of
which VBOs is part), so it's time to upgrade to bleeding edge SDL 2.0!
This was largely painless (although I did spend several hours trying to debug an issue with SDL_ttf not loading my font file, a problem which mysteriously resolved itself after I left my PC alone for an hour or so), and now allows me to pull in GLEW which handles everything to do with loading OpenGL extensions.
So now I have VBO support and it's time to try and get fonts rendering the way I want. Let's see how that goes, and I'll post an update when I succeed.
Blogging Again!
I blog so infrequently it's ridiculous. I think perhaps the last time I blogged it was back in 2007 and I was still an undergrad.
More often than not I tend not to blog due to a lack of anything interesting to say! I have no intention of blogging about things relating to my personal life, so I'm essentially limited to blogs regarding technology, or programming or some other related subject.
These days I primarily write JavaScript (and you will catch me calling it Javascript more often than not), but occasionally I delve back into C++. Hopefully I will be able to impart some form of knowledge of these languages, as well as observations on Git, Games, and anything else technological that takes my fancy.
If I keep it up for more than a month, I might buy myself some cake.